App access and app roles/permissions
ERP•AI has two levels of access control:
| Level | Controls | Where |
|---|---|---|
| Organization roles | What a member can do across the organization (create apps, manage members, billing, API keys…) | Settings → Access Roles. See Members and roles |
| App roles | What a user can see and do inside one app (tables, views, pages, workflows, settings…) | App Settings → App Permissions (this article) |
Invite someone new (two steps)
- Add them to the organization: Settings → Members → Invite User. Enter their email, choose an organization role (for most staff, Limited Access: they only see the apps you share with them), and click Send invite.
- Give them this app: once they’ve joined, open App Settings → App Access (or Invite User at the top right of the app) and assign an app role.
App Access only lists people who are already in your organization, so do step 1 first.
App Access: who can use the app
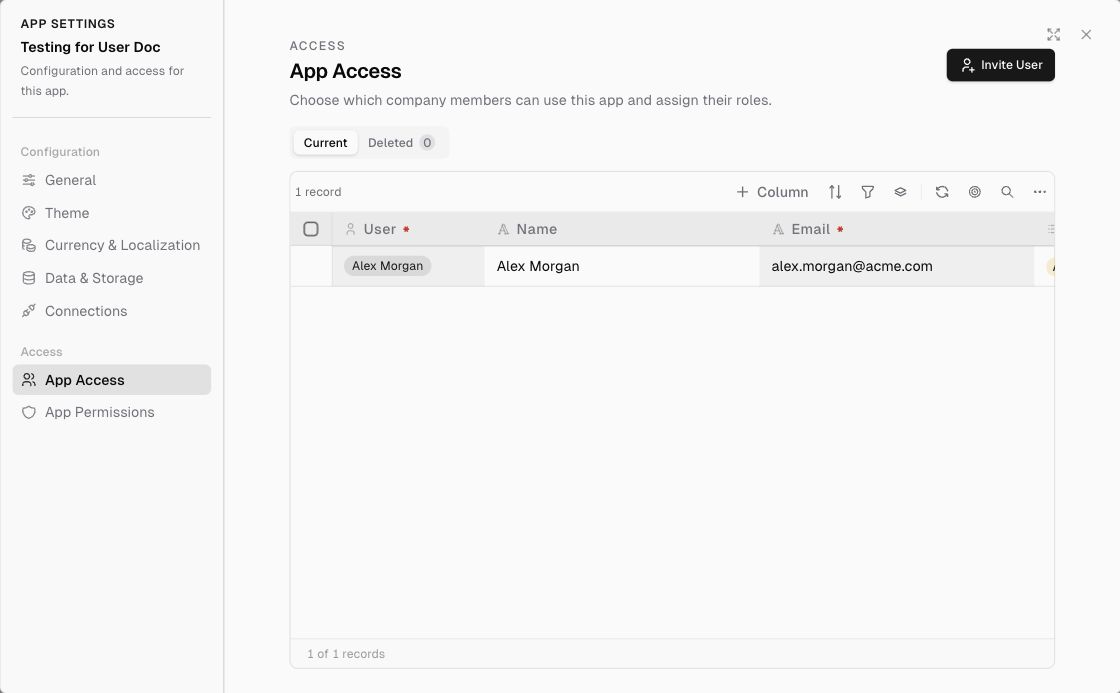
- Open App Settings → App Access, or click Invite User at the top right of the app.
- You’ll see the app’s users in a table with User, Name, Email, Role, and Status columns, plus Current and Deleted tabs.
- Click Invite User to give a member of your organization access and assign them an app role.
The list works like any ERP•AI table: you can add columns, sort, filter, group, and search.
App Permissions: roles
Open App Settings → App Permissions. Every app has three system roles:
| Role | Summary |
|---|---|
| Admin | Full control of the app (all permissions) |
| Manager | Works with all data and most features, but can’t administer everything |
| View Only | Can read data, but can’t change it |
System roles are read-only. To change permissions, click + Add Role and create a custom role (for example Sales Rep, Approver, Warehouse Clerk).
What a role controls
When you open a role, permission areas are listed on the left and individual permissions on the right. You can also search permissions.
| Area | Permissions |
|---|---|
| All Tables (or per table) | Table: View, Edit, DeleteColumns: Create new column, Edit columns, Delete columns, Edit field visibilityRecords: View records, Create new record, Edit records, Delete records, Bulk edit records, Bulk delete records, Lock/unlock records, Export records, Edit records in table layout, View record logs, Print records, Process recordsForm: Edit form layoutComments: View, Add, Edit, Delete commentsCustom actions: View custom actions, Manage custom actions |
| All Views (or per view) | The same kinds of permissions as tables |
| App | Access to the app |
| Users | Manage the app’s users |
| Roles | Manage app roles |
| Workflows | View, Create, Edit, Delete |
| All Pages | View page, Edit page, Delete page, Create new page |
| App Settings | Manage, Arrange menu |
| Audit Logs | View the app’s audit logs |
| Import Logs | View import history |
| Trash | Use the Trash |
| API Documentation | Manage API docs |
| Usage Tracking | View usage |
| Documents | View, Create, Edit, Delete documents; View and Manage templates |
| Mail features (several separate permissions) | |
| Connections | Manage integration credentials |
| Sync Operations | View, Manage |
| Snapshots | Snapshot permissions for this app |
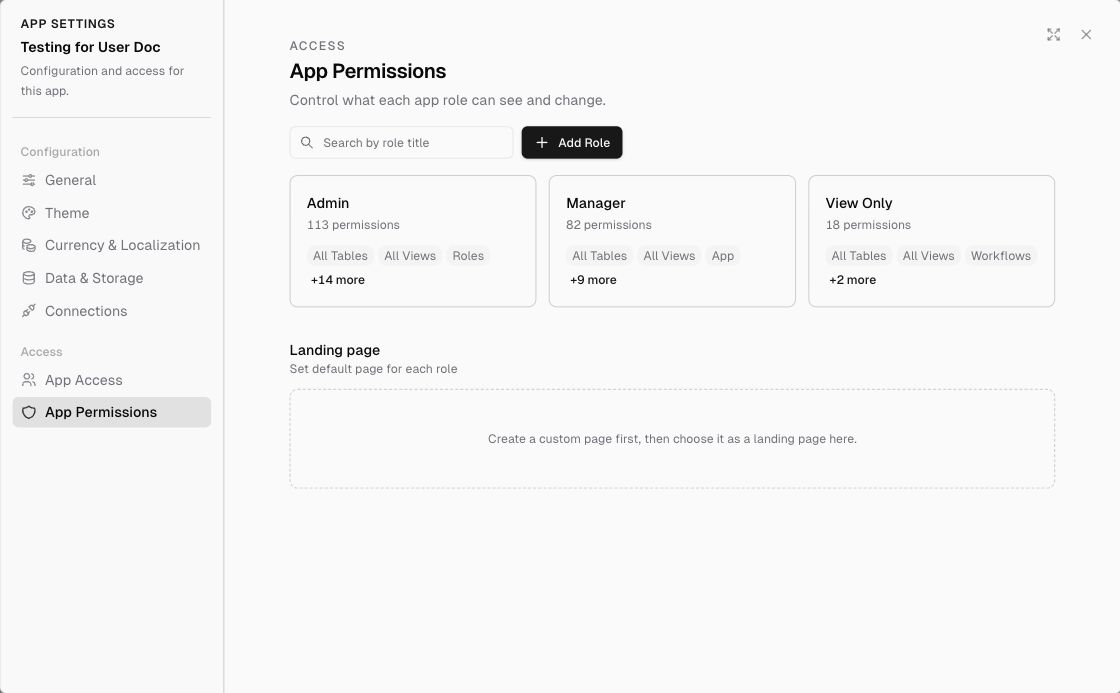
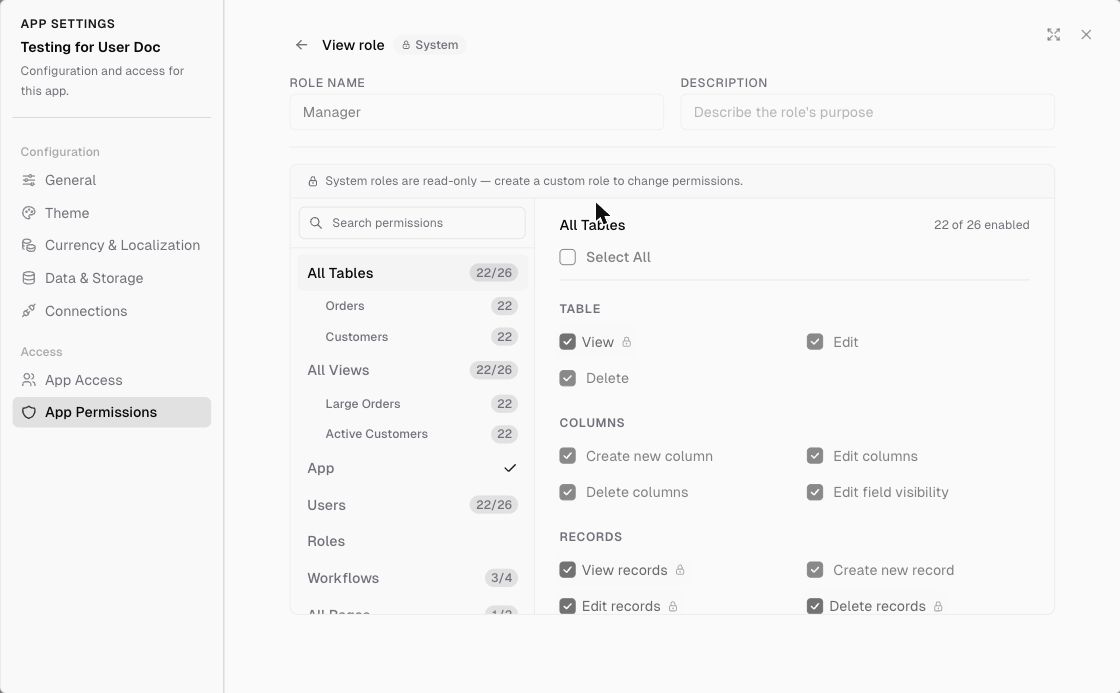
Table-level permissions
Under All Tables, each table is listed separately (for example Orders, Customers), so you can give a role different rights on each table. For example, Sales Reps might edit Orders but only view Products.
Show each person only their own records
A common setup: sales reps see only the deals assigned to them.
- Make sure the table has a User field for the owner (for example Owner or Assignee).
- Create a view with the filter Owner is Current User (for example My Deals). See Views.
- Create a custom role (App Permissions → Add Role). Under All Tables, turn off View for that table, and under All Views, allow the My Deals view.
- Under Records, leave Delete records off if the role shouldn’t delete.
- Assign the role to the reps in App Access.
Records outside the view stay hidden from that role everywhere, including the API.
Landing page per role
Under Landing page, choose the default page each role sees when they open the app. You need at least one custom page first.
Best practices
- Follow least privilege: give each role only what it needs.
- Use views plus view permissions to show people only their slice of the data.
- Review roles whenever you add new tables or pages.